Are you bored of creating the usual arrows for your presentation? Are you looking for ways to make your presentation more interesting and eye-catching?
Well, we have a solution for your dull and boring presentation. It will not only make your presentation far more interesting and eye-catching but will totally transform it. The solution is creating fully customized 3D arrows. Yes, you heard it right. Create 3D arrows and that too under 2 minutes. So, what are you waiting for? Follow these steps and create 3D arrows in PowerPoint.
What you will learn in this tutorial:
 Steps To Create 3D Arrows:
Insert an Arrow shape:
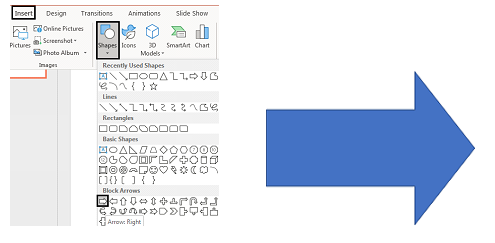
The very first step is to insert a regular arrow shape to your slide. To do so: Go to the
Insert tab and select
Shapes. Locate
Block Arrows and select the very first
Right Arrow (as shown in the figure below).
 Create a Rectangle:
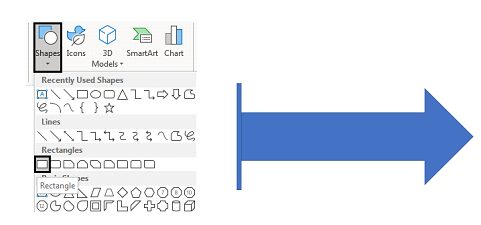
From the
Shapes menu choose a
Rectangle and adjust its dimensions. Place this rectangle over the arrow as shown in the figure.
 Place Rectangles:
Duplicate this rectangle five times by clicking on
Control + C and
Control + V. Now place these rectangles over the right arrow.
 Align Rectangles:
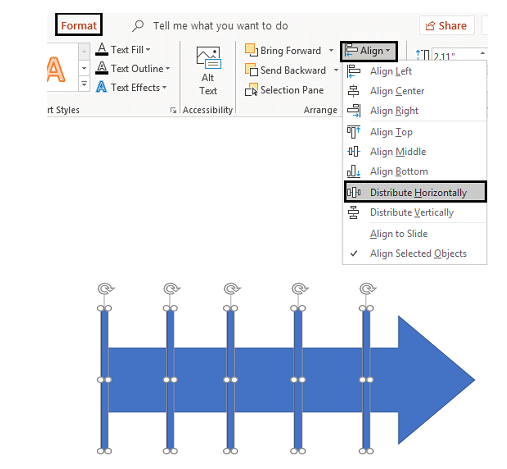
Select all the five rectangles. Distribute them horizontally by clicking on
Format> Align> Distribute Horizontally.
 Delete the first Rectangle:
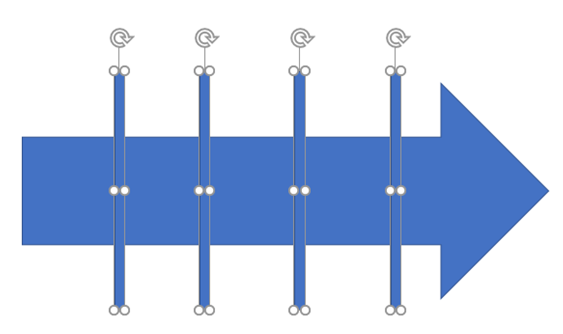
Delete the very first rectangle towards the left side as shown in the figure. Select all the other four rectangles.
 Choose Fragment:
After selecting all the other four rectangles create equal fragments. To do so click on
Format> Merge Shapes> Fragment.
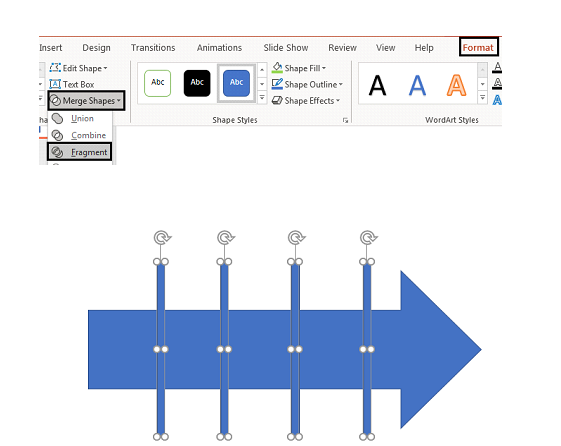
Delete all the other four rectangles. Your image is now fragmented into five equal parts as showcased in the figure below.
 Fill the Shape with Color:
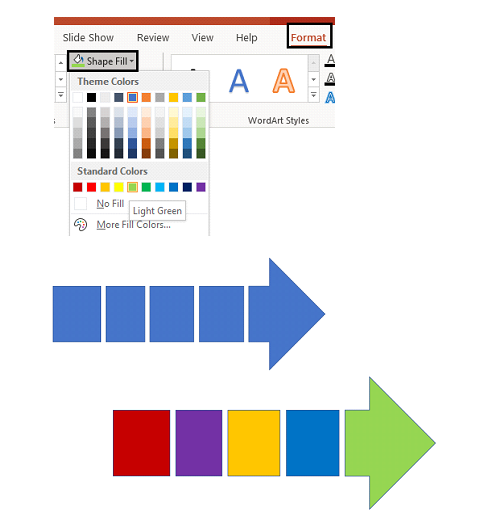
Select the shape you want to fill color in. Go to
Format> Shape Fill and choose
Color. Continue following these steps for the rest of the shapes as shown in the figure below.
 Remove Outline:
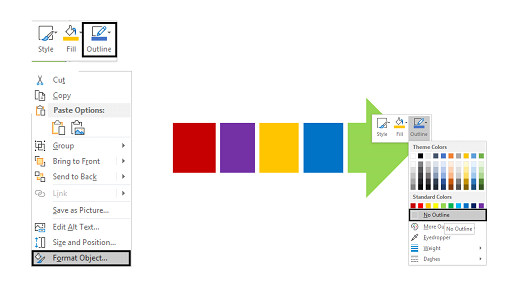
Select and right click the entire figure. Go to
Format Object option. Select
Outline> No outline to remove the outline.
 Group Shapes:
Group all the shapes together by selecting them and clicking on
Control + G.
 Create 3D Effect:
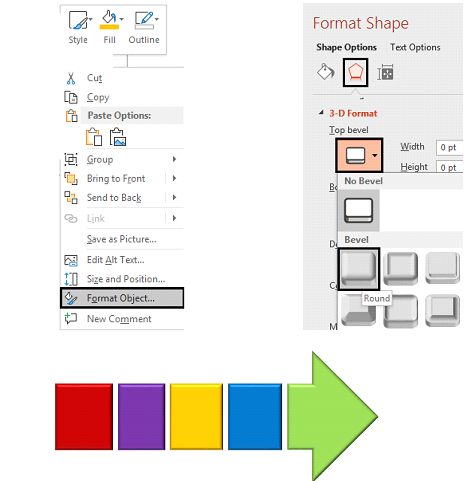
Select the entire figure, right click and select
Format Shape. A Format Shape dialog box appears to the right side from which select
Shape Options> Effects. Click on the
3D Format option and select
Top Bevel as
Round (see the figure below).
Note- Increase the
Depth to 20pt for a much better effect.
 Apply 3D Rotation:
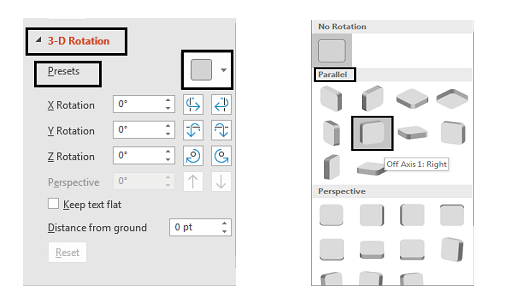
To create a 3D rotation, select
3D Rotation> Presets> Parallel> Off Axis 1 Right (as shown in the figure below).

You can always adjust the text, size and direction of the arrow as per your business requirements. In order to make your work much simpler, we have added a few variations of these arrows which you can make use of.

You can bring as many variations as you like in your 3-D arrow by changing the
presets as we have done below.

We have also shortlisted some of our best 3D arrow designs for your presentation.
Professionally Designed PowerPoint Templates
Professional PowerPoint Template #1

Click
here to download this professional designed 3D Arrow diagram for PPT slide.
Professional PowerPoint Template #2
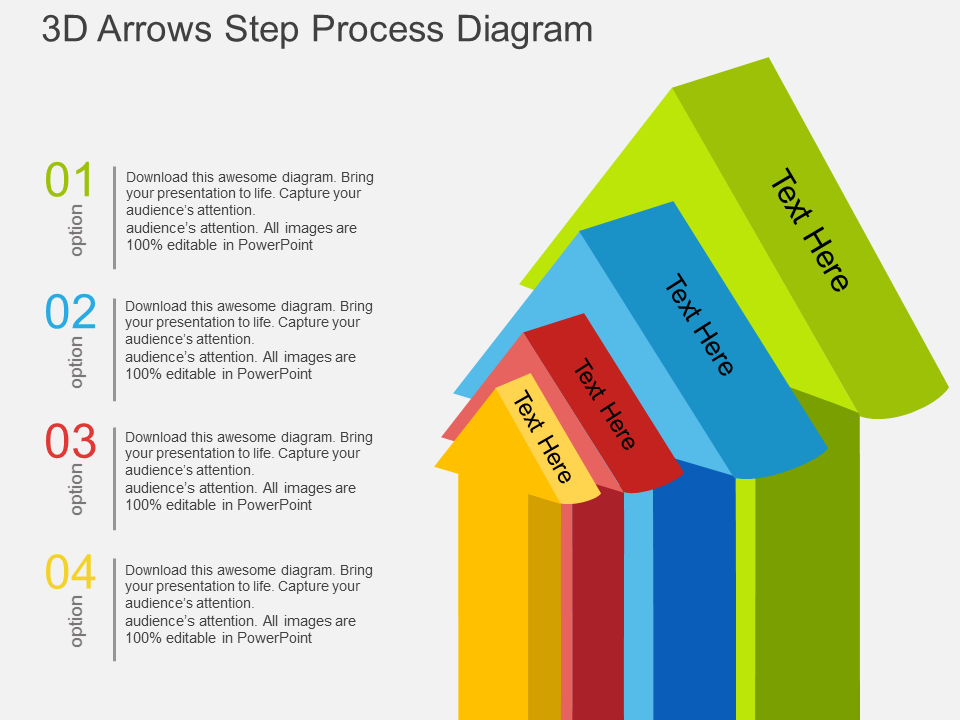
Grab this amazingly designed 3D Arrow diagram PowerPoint template by clicking
here.
Professional PowerPoint Template #3
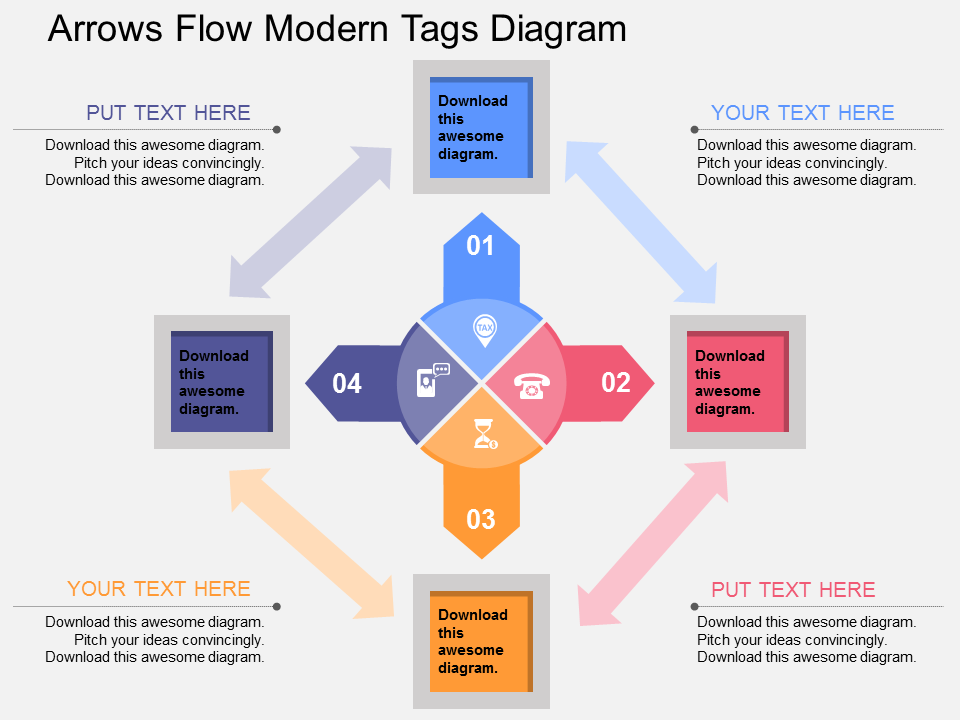 Grab
Grab this eye-catching 3D Arrow diagram PowerPoint design.
Professional PowerPoint Template #4
 Download
 this amazingly designed 3D Arrow diagram PPT and engage your audience.
Professional PowerPoint Template #5
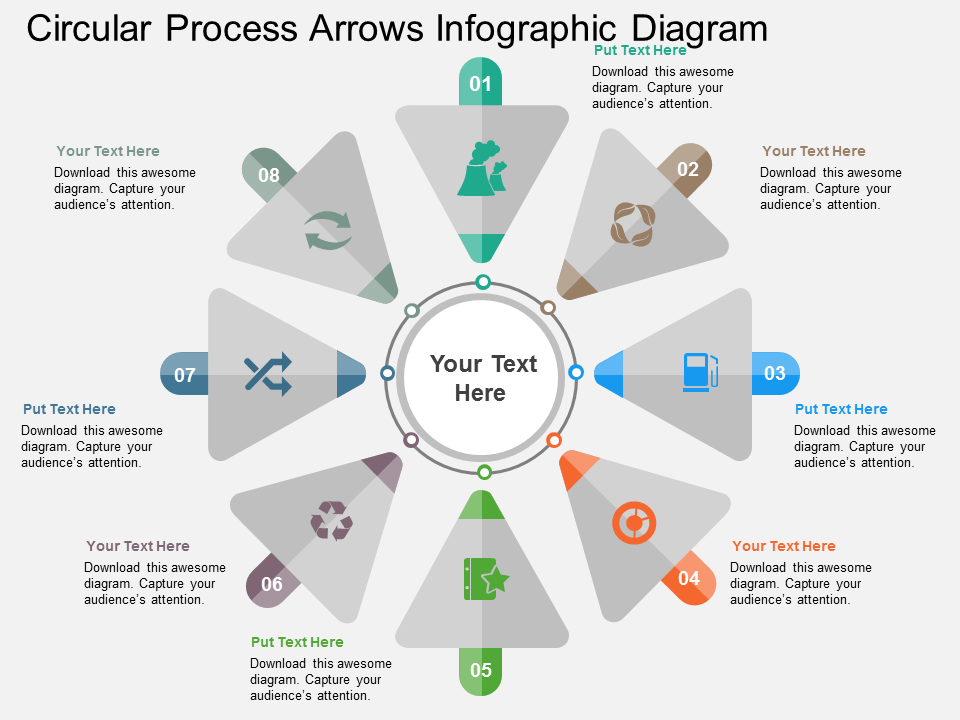 Grab
Grab this professionally designed 3D Arrow diagram PowerPoint template.
Professional PowerPoint Template #6
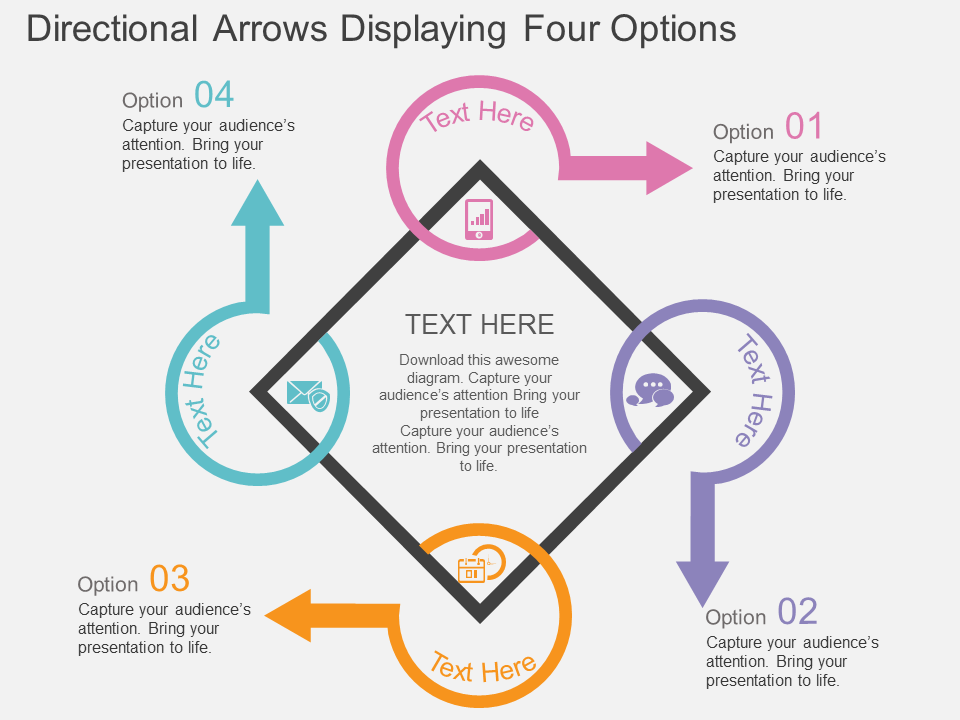
Click
here to download this 3D Arrow diagram PPT template.
Professional PowerPoint Template #7
 Grab
Grab this amazingly designed 3D Arrow diagram PPT slide.
Professional PowerPoint Template #8

Click
here to grab this creative 3D Arrow PPT template.
Choose the one you like the most.
Good luck.
 Steps To Create 3D Arrows:
Insert an Arrow shape:
The very first step is to insert a regular arrow shape to your slide. To do so: Go to the Insert tab and select Shapes. Locate Block Arrows and select the very first Right Arrow (as shown in the figure below).
 Create a Rectangle:
From the Shapes menu choose a Rectangle and adjust its dimensions. Place this rectangle over the arrow as shown in the figure.
 Place Rectangles:
Duplicate this rectangle five times by clicking on Control + C and Control + V. Now place these rectangles over the right arrow.
 Align Rectangles:
Select all the five rectangles. Distribute them horizontally by clicking on Format> Align> Distribute Horizontally.
 Delete the first Rectangle:
Delete the very first rectangle towards the left side as shown in the figure. Select all the other four rectangles.
 Choose Fragment:
After selecting all the other four rectangles create equal fragments. To do so click on Format> Merge Shapes> Fragment.
 Delete all the other four rectangles. Your image is now fragmented into five equal parts as showcased in the figure below.
 Fill the Shape with Color:
Select the shape you want to fill color in. Go to Format> Shape Fill and choose Color. Continue following these steps for the rest of the shapes as shown in the figure below.
 Remove Outline:
Select and right click the entire figure. Go to Format Object option. Select Outline> No outline to remove the outline.
 Group Shapes:
Group all the shapes together by selecting them and clicking on Control + G.
 Create 3D Effect:
Select the entire figure, right click and select Format Shape. A Format Shape dialog box appears to the right side from which select Shape Options> Effects. Click on the 3D Format option and select Top Bevel as Round (see the figure below).
 Note- Increase the Depth to 20pt for a much better effect.
 Apply 3D Rotation:
To create a 3D rotation, select 3D Rotation> Presets> Parallel> Off Axis 1 Right (as shown in the figure below).

 You can always adjust the text, size and direction of the arrow as per your business requirements. In order to make your work much simpler, we have added a few variations of these arrows which you can make use of.
 You can bring as many variations as you like in your 3-D arrow by changing the presets as we have done below.
 We have also shortlisted some of our best 3D arrow designs for your presentation.
Professionally Designed PowerPoint Templates
Professional PowerPoint Template #1
 Click here to download this professional designed 3D Arrow diagram for PPT slide.
Professional PowerPoint Template #2
 Grab this amazingly designed 3D Arrow diagram PowerPoint template by clicking here.
Professional PowerPoint Template #3
 Grab this eye-catching 3D Arrow diagram PowerPoint design.
Professional PowerPoint Template #4
 Download this amazingly designed 3D Arrow diagram PPT and engage your audience.
Professional PowerPoint Template #5
 Grab this professionally designed 3D Arrow diagram PowerPoint template.
Professional PowerPoint Template #6
 Click here to download this 3D Arrow diagram PPT template.
Professional PowerPoint Template #7
 Grab this amazingly designed 3D Arrow diagram PPT slide.
Professional PowerPoint Template #8
 Click here to grab this creative 3D Arrow PPT template.
Choose the one you like the most.
Good luck.
 Home
Home 

 Customer Reviews


